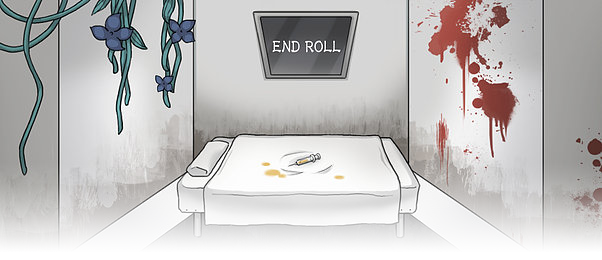
END ROLL is a regretful adventure RPG by Segawa made in RPG Maker 2000. It has turn-based battles, three endings, and quite a lot of optional content.
A boy named Russell is made to take part in an experiment.
His room contains nothing but a bed, a pre-recorded video, and a syringe.
It seems now he has no other choice.
...
A boy named Russell moves into a new town to lead a happy new life.
WARNING:
This game is rated R-15. You should be at minimum 15 years old, but probably older.
Besides graphic content and a wide array of disturbing themes, the game ends up being very dismal, cruel, and lacking in hope as it progresses. If you are affected by extreme negativity, please steer clear of this game.
(Content Severity: Very Severe)
Click here for more detailed content warnings.
Numerous kinds of murder.
Depiction of suicide.
Blood and gore.
Abuse.
A rather hopeless outlook in general with a downward trend.
Some horror-like scenes (but minimal jump scares, and no chases).
Allusions to topics of drug use and drug violence.
One entirely-optional area with allusions to pedophilia.
Some mentions of drinking.
Some mentions and allusions to sex.
Creatures/areas/etc. with lots of eyes, and some other body horror.
Some animal death, most notably an optional area about a dead pet.
Ableist language.
Some swearing.
Download END ROLL 2.01 | (Mirror)
(Chrome may falsely flag the download as malicious, but it's safe to ignore.)
Supported Platforms
The game's engine is made for Windows only, with no native support for other platforms.
The multi-platform EasyRPG Player mimics the behavior of RM2K and RM2K3, but may not always be exact. (Make sure to treat the Data folder as the game folder, not the containing folder.) Also, for Macs, you can try a general-purpose tool like WineBottler.
Usage Notes
Videos and live streams are allowed. However, you must at least give some content warning (R-15 rating and/or specific warnings) to viewers.
All the music (except the hospital music) is by Segawa, so refrain from reposting it.
Fanworks are allowed if they are clearly stated as fanworks and "are not made with the intent of profit." Segawa leaves it up to your own good sense where the border for this lies. (It states "if it's within the realm of hobby," so selling at conventions is likely fine.)
Do not repost or modify images from the game data or the official site. This includes the use of them for avatars or the like, as well as for use in sold fanworks.
Troubleshooting
Make sure to extract the game to its own folder instead of running directly from the ZIP file. If you don't do so, any saves made will be lost the next time you run the game.
If you get a DirectDraw error, right-click the EXE, go to Properties, Compatibility, and try other compatibility modes.
If the font doesn't seem correct, download and install the MS Gothic font.
RPG Maker 2000 has some inherent, unfixable control bugs ("automatically moving in a direction" or "no buttons work"). The issues often seem to involve gamepads, or getting "stuck" on an input if Shift and a Numpad key are pressed simultaneously. Thus, try fiddling with gamepads and your keyboard until it fixes. (Reinstalling the game likely won't help.)
If you get "not implemented" errors on or near startup, make sure you have a working sound device (speakers/headphones). It can also occur mid-game if your system doesn't like a particular MP3, in which case, try to delete or replace the file in Music.
You may get "RPG Maker 2000/2003 RTP is not installed" or missing file errors on startup. This can happen if the path contains special symbols, causing files (including RPG_RT.ini) to not be found. Try moving the game folder somewhere without any special symbols in the path.
Screenshots
Walkthrough
A guide through the game and its optional content. There's also some general information if you don't want to spoil things as much.
Each day of the walkthrough has three sections. First are the main plot events that advance the story. Second are "guilt events" that become available on that day (and may be doable on later days). Third are other sidequests that become available on that day.
Walkthrough
General Information
A main factor in what ending you get is your Guilt Level, which increases by seeing optional scenes.
You can check your guilt by talking to Nightmares, shadowy eye-creatures who appear in a few places (but not the ones that chase and attack you).
If you don't have at least 20 Guilt by the end of Day 5, you will get the Normal Ending.
I mostly included "sidequests" that have a concrete reward, but there is lots of incidental dialogue to be found.
The townspeople generally get new dialogue each day, and during different parts of the day.
The safe rooms in dungeons feature character dialogue for your current party, and a few update over time.
Many NPCs get new dialogue each day, and may have different dialogue depending on if it's day or night.
I indicate when sidequests can only be done a certain day, or can't be done after a certain day.
However, beating the boss on Day 7 is a point of no return for all quests.
Global Sidequest Info
Recruiting Raymond
- Before the start of Day 5, buy a total of at least 3 items from Raymond when he appears as a peddler. (Sad Birthday House on Day 2, Catties' Secret Route on Day 3, Darcover Town on Day 3, Dragons' Peak Warehouse on Day 4, Deepsea Hotel on Day 4 after finishing warehouse.)
- On Day 5, talk to Fairia, Yue, and Walter, then talk to Raymond in the Incarners' Market and ask about Fairia. (Alternatively, bring Walter. Bringing Walter is only an alternative for this step; you need to have bought 3+ items either way.)
- Follow Raymond to Dreamsend Trade and see him talk with Yue. (Must do this before night, since the store will close.)
- Go to Dreamsend Research for a scene. Beat the boss of the Unregulated Space, and Raymond will join.
Recruiting Walter
Go to the Dreamsend Research building that appears in Dozing Forest on Day 5.
Defeat all six bosses, then talk to Walter. Note that he will not join on Day 7.
Plant Locations
Once you get the Watering Can from the Cattie in the Catnip room on the Secret Route, you can water plants.
After clearing the Ruins of the Wise One, you can also access a room with all the plants you've encountered.
Accessible From Day 3
- Healthy Carrot x4: In the communal field outside Gardenia's house.
- Turnimp x2: In the communal field outside Gardenia's house.
- Lafflower: In Kantera's shop.
- Catnip x2: In the catnip room on the Secret Route.
- Cacten #1: In the catnip room on the Secret Route.
- Cacten #2: In the Guide-Selling Old Lady's house.
- Flimseed & Trumpetal: In Puddle Apartments Rooms 101 and 105.
Accessible From Day 4
- Chrysanthemunch x4: Two outside, two inside the plateau house on Dragons' Peak.
- Cacten #3: In the medicine shop on Dragons' Peak.
- Higanbana x2: In the field of higanbana in Funerale.
- Chillsprout: In Snow Village.
- Candlebranch & Palm: In a room in the Warped Birthday.
Accessible From Day 5
- Rosedud & Darcover Flower: In the back room of Saxon's house.
- Towerflower: On the right side of the Clover Hospital reception area.
- Yama-Basho: In the well on Dragons' Peak (Day 5 only).
- Cacten #4: To the left outside Clover Hospital.
- Cacten #5: Deep in the Place of Pity.
For watering all the plants, the Observers of Knowledge give you the Wise One's Branch (element resistance accessory) and Infinite Rootie (Homeward Rootie with infinite uses).
Bath Scenes
These combinations result in scenes in the Resort Island bath.
For the groups of three, you must only have those members and no fourth member.
- Russell + Tabasa + Gardenia
- Russell + Cody + Dogma
- Russell + Mireille + Gardenia
- Russell + Tabasa + Yumi
- Russell + Yumi + Mireille
- Russell + Kantera + Walter
- Russell + Kantera + Yumi + Mireille
- Russell + Cody + Yumi + Mireille
- Russell + Tabasa + Dogma + Kantera
- Russell + Raymond + Walter
- Russell + Raymond + Dogma
- Russell + Kantera + Raymond
- Russell + Gardenia + Cody
Day 1
Main Plot
Go introduce yourself to everyone in town.
After you've talked to everyone, talk to Tabasa again. He'll ask you to help look for Gardenia's hair ornament.
Head into Dozing Forest to the west. Keep heading west to the cliff.
Defeat the Witnessing One.
Deliver the hair ornament to Gardenia.
Go home and read the note.
Guilt Events
None.
Sidequests
Where It Stops (Day 1 Only)
Talk to the Incarner on the path into Dozing Forest. Give them some words of encouragement.
You'll get a Super Ball, and they'll show up again later on.
Helping Hand (Day 1 Only)
Talk to the Incarner inside the tree before fighting the Witnessing One and hear them out.
Return afterward for a Doubt Bracelet.
Day 2
Main Plot
Visit the newly-opened "infor!Mashun" building and talk to the informant.
Go talk to Gardenia. Accompany her to the Incarners' Market in Dozing Forest.
After asking for a frying pan at the market, return to the informant to get the Celebration Compass.
Use the compass to open a path inside the tree in Dozing Forest. Head into the dungeon.
Go to the differently-colored wall in the middle and knock on it to learn Sorrow.
Go to the door on the right and use Sorrow.
Defeat the Lamenting One.
Take Gardenia home.
Go home.
Guilt Events
None.
Sidequests
Just a Heads-Up (Day 2 Only)
Go to the SOS? building and talk to Yumi.
Distribute Heads-Up Flyers to everyone's mailboxes. You get 5 Walnuts as a reward.
Raymond the Peddler (Day 2 Only)
In the Sad Birthday house, you can find Raymond.
He'll peddle you a Super Ball. Refuse once to get it for cheaper.
If you want him to join you later, you'll need to buy 3 or more peddled items from him before Day 5.
(There are a total of five opportunities to buy from him, and one is easy to miss.)
Day 3
Main Plot
Get the ID Card from the mayor, allowing access to other towns.
Go to the church for a scene. Go with Cody to look for Dogma.
Head north from the Incarners' Market to Darcover Town.
Find Dogma at Dead Tree Hill. Then rest at the inn.
Go into the house in the bottom-left and have Dogma join.
Check the plants blocking the way to Dead Tree Hill. Defeat all the flower sculptures around town.
Once all are defeated, Russell will learn Anger, and you'll be able to go to Dead Tree Hill.
Defeat the Burying One.
Return to the bottom-left house and talk to the people.
Go home.
Guilt Events
In Memoriam (Day 3 Only)
Talk to Tabasa after getting the ID Card.
Go to the florist in Darcover Town with Tabasa in the party to get Great Flowers.
Then go to the cliff west of the Incarners' Market to make a grave.
Tabasa learns Warning Shot, Russell learns Consolation, Guilt +5.
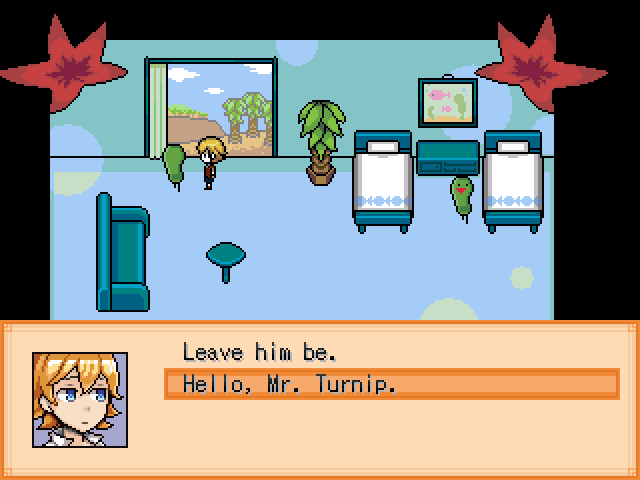
Farewell to Kelp (Before Day 7)
At Seaside Relaxing Hotel (the left one), enter the right room on 2F and say "Hello, Mr. Turnip." to the kelp.
Russell learns Red Eye, Guilt +5.
Puddle Apartments (Before Day 7)
Talk to the lady by the entrance inside the right hotel in Seaside.
Get an autograph from Dazzilyn (or her bodyguards) on the beach, and give it to the lady for the Sea Compass.
Use the Sea Compass, then take the left hotel's elevator to B1F.
Hear about Russell's friend in Puddle Apartments.
Guilt +5.
Sidequests
The Guide-Selling Old Lady
Starting Day 3, you can access the Guide-Selling Old Lady's house from infor!Mashun.
Birthday Birthday Panic (Day 3 Only)
Before night, return to the Sad Birthday with Gardenia and head to the back room to have her learn Heartracing Veggies.
Of Catties and Catnip
After getting the ID Card, go south then east from the Incarners' Market to the Catties' Secret Route.
- Things to find in the Secret Route:
- The white paper bag the Catties outside ask for is over toward the top-right of the cave, and you must fight a Cattie for it.
- Raymond is here (Day 3 only), so you can buy an Iron Pole from him (as before, say no once for a lower price).
- If you helped the spinning Incarner on Day 1, they'll appear here (Day 3 only). Help them again for a discount on the villa sold in Seaside.
- The Cattie in the catnip-growing room will give you a Watering Can, which lets you water plants in many places.
- You can buy some Catnip from a Cattie in the top-right of the first screen. Give it to the Cattie in the top-left to access Cloakpoint.
- In the side room on the path to Cloakpoint, you can find the Stone Compass.
- Things to do in Cloakpoint:
- There's a Cattie who wants 30 Awakening Pills and gives you a Mistrust Bracelet.
- The Only You Theater shows two movies, one during the day and one during the night, which you can watch with each party member. It closes on Day 7.
Ruins of the Wise One
The Stone Compass in the Secret Route creates a game console in the gallery right of Russell's house.
It takes you to the Ruins of the Wise One.
- Answers to the Knowledge Box questions:
- Seaside hotels: "Relaxing" and "Relieving"
- Unfought monster: Friendly One
- Buildings in Nameless Town: 11
- Cost of Awakening Pill: 1
- Gives rest: Pink balloon
- Retrieved on Day 1: A hair ornament
- How many riddles: 7
- Answers to the battle questions:
- Non-existent facility: Bakery
- First weapon: Wood Stick
- Compass used: Stone Compass
- Jack-in-the-Box: Makes enemy falter.
You're rewarded with the Wise One's Stone and the room of plants, which fills in as you water plants around the world.
Vacation Days
You can buy a holiday villa from Seaside for 150 Walnuts, or 100 if you helped the spinning Incarner twice.
- Things to do on Resort Island:
- Listen to all the music in the game.
- Go in the bath with others, and use bath salt to increase stats for your current party. Certain party combinations result in short scenes.
- Fish, and have the fish cooked to get stat boosts for the whole party.
- Access a bonus dungeon on Day 7 after meeting certain requirements.
The Good Word (Before Day 7)
Go to Puddle Apartments Room 103 at night with Dogma in the party and talk to the resident.
You get a Happiness Jar.
Day 4
Main Plot
Talk to Kantera wandering around town and aid him in finding what he lost.
Go to the SOS? building to ask Yumi about the compass, then leave.
Pick up the Dragon Compass on the ground at the Incarners' Market.
Use it to open the path to Dragons' Peak (the torii gate south of the market).
Talk to the owner of the warehouse in the top-left of Dragons' Peak and go inside to look for the scroll.
Check the small scroll on the wall, and two Jizo statues will appear.
Talk to both, then check the middle shelves in the top-left for the Chronic Medication.
Talk to the new Jizo statue. Russell will learn Doubt.
Head to the middle-right of the warehouse and a box will drop from the shelves. Take the Draken Manjuu.
Talk to the new Jizo statue next to the dragon to get the Death Medicine.
Go to your items and select the Draken Manjuu, which will make Poisoned Manjuu.
Feed the Poisoned Manjuu to the white dragon and enter the door that appears.
Talk to the Jizo statues at the very back. Go back to the pink balloon to rest.
Talk to Kantera, take the knife, and do as he requests. Afterward, proceed ahead.
Defeat the Aged One.
Go apologize to the warehouse owner.
Go home.
Guilt Events
The Aftermath (Day 4 Only)
Once you have Kantera with you, talk to either Cody or Dogma.
Take the one you talked to (without the other) to Dead Tree Hill.
Person taken learns Goddess's Protection, Guilt +5.
Homecoming (Day 4 Only)
Ask "Gardenia?" (inside her house) about Gardenia's father.
Tell the Gardenia outside he's not coming home.
Guilt +5.
Good Memories (Before Day 7)
Talk to the Pengi by the elevator in the right Seaside hotel.
Take the elevator down to Deepsea Hotel and defeat the boss there.
Guilt +10.
Sidequests
Cleanup Duty (Day 4 Only)
Talk to the guy in the bottom-left house in Darcover Town.
Help clean up the vines around town. You'll get the Flower Compass.
It opens the way to Funerale at the fallen tree on Dead Tree Hill.
Address Unknown (Before Day 7)
If you've been to Puddle Apartments, talk to the Funerale manjuu seller with Kantera in the party.
They'll ask you to make a delivery to Room 104 at Puddle Apartments.
For doing this, they'll teach Kantera Higanbana Song and lower their price.
Eloquently Put (Before Day 6)
With Cody, talk to the Incarner inside the Incarner Market tree about Shiitalky Mushrooms.
Go find one under one of the trees in the marketplace. You get three Jack-in-the-Boxes.
An Happy Birthday
Starting Day 4, reaching 10 Guilt will cause the Sad Birthday to be warped.
Go there with Gardenia and light all the candles to access an optional boss who drops Dad's Frying Pan.
Just a Little Dying
Before beating the boss of Deepsea Hotel, there's a collapsed Pengi in the restaurant.
Give them a Trial Pill to get their Safety-First Helmet.
Cures What Ails You
With Kantera in the party, go see the Foreman in Cloakpoint.
You'll get a Cat-Ear Poncho.
Snow Fun At All
One of the bottom-left shelves in the Dragons' Peak warehouse has the Snow Compass.
Use it to access Snow Village under the clock tower in Cloakpoint.
- Things to do in Snow Village:
- Talk to all of the Catties, then go to the village entrance for a scene with their boss.
- You can buy bait and go fishing in the river.
- You can give 7 Moonfish to a Snow Spirit to have them make Moonfish Soup, and can do so repeatedly.
Raymond Again (Day 4 Only)
Raymond appears in the second section of the Dragons' Peak warehouse until you beat the boss.
You can buy an Arvoid Branch from him (say no once for a lower price).
Raymond can appear in Deepsea Hotel on Day 4, but only after beating the warehouse (and before the hotel boss).
You can buy an Anti-Cold Guide from him (say no once for a lower price).
Day 5
Main Plot
Go check on the mayor. Mireille will accompany you to Clover Hospital.
Get Saxon's clinical records from Kantera.
Go to Seaside (south from Dozing Forest) and to the west to reach Clover Hospital.
Give the records to the receptionist. Afterward, you must fulfill three objectives before your name is called.
1. Jealousy of Fame
Talk to the black-haired boy in the room on East Ward 1F.
Talk to the blonde nurse on the left side of the entrance area.
Catch a spider in the boys' bathroom on West Ward 1F.
Show the spider to the blond-haired boy in the room on East Ward 1F.
2. Jealousy of Wealth
Talk to the nurse on the roof of West Ward.
Talk to the nurse at the reception desk on West Ward 2F and select "Are you busy now?"
Go to the treatment room on the right side of West Ward 2F, switch out the medicine, and leave the room.
(Things go a bit differently depending on which you choose.)
After the nurse runs, go back to the other nurse on the roof of West Ward.
3. Jealousy of Love
Talk to the girl near the stairs on East Ward 1F.
Buy a drink from a vending machine and talk to the black-bob girl on East Ward 1F to play hide-the-can.
(Note: Besides a can to hide, you'll also want a Cola.)
Talk to the patient by the elevator on West Ward 1F to learn about using Cola to melt some of the tentacles.
Go to West Ward 2F, enter the storeroom by using Cola on the round tentacles, and hide the can in the box.
Report back to the black-bob girl. Then return to the storeroom.
After reuniting with Mireille, go up to the consulting room on East Ward 2F.
Defeat the Jealous One.
Go up to the roof for a scene.
Read the diary in the room next to the consulting room and get the Effective Medicine.
Return to town and give Saxon the medicine.
Go home.
If you don't have 20 or more Guilt by this time, you'll get the Normal Ending here.
However, there are enough guilt events available that you can still get from 0 to 20 on the night of Day 5.
Guilt Events
Be Cursed (Day 5 Only)
Take the Yama-Basho from the well on Dragons' Peak.
Guilt +5.
Cy-clops
There's an injured horse outside the Catties' Secret Route.
You can go with Tabasa to treat it (and have him learn First Aid).
For the guilt event, however, you must go without him and choose to "give it rest."
Guilt +5.
White and Red
Get the Red Compass from the right Patient Room in Clover Hospital West Ward 1F.
Use it to enter the Place of Pity left of Gardenia's house, and hear about the rabbit.
Guilt +5.
Sidequests
Recruiting Raymond (Day 5 Only)
If you've bought at least three items from Raymond, you can recruit him on Day 5.
- Talk to Fairia at Dreamsend Guidance, Yue at Dreamsend Trade, and Walter at Dreamsend Research.
- After talking to all three, talk to Raymond at the Incarners' Market and ask about Fairia. (Alternatively, recruit Walter and bring him there.)
- Follow Raymond to Dreamsend Trade and see the scene there.
- Go to Dreamsend Research and beat the Unregulated Dungeon.
Dream Samples
On Day 5, Dreamsend Research appears south of the Incarners' Market.
You can fight bonus bosses there, and if you beat all of them (earlier than Day 7), you can recruit Walter.
Lifelong Goal
Give the Yama-Basho from Dragons' Peak to the Cattie looking off into the sky in Cloakpoint for the Candy Compass.
(If you refuse twice, you won't be able to get the compass.)
Kindness of Strangers
The Candy Compass opens the path to the Village of Kind Strangers in the boys' bathroom in the hospital.
There isn't much to do there, however. It can easily be skipped if you're averse to the content.
Don't Come Back
With less than 20 Guilt, someone in Darcover Town will ask you to tell his sister in Seaside what's going on.
(It is technically possible to do this while doing all other quests if you're careful about what guilt events you do.)
Note that you get no good reward for this.
Say Your Prayers
With 20 Guilt or more, go to Dead Tree Hill in Darcover Town with Cody and/or Dogma.
There, you can fight an optional boss who drops a Darcover Coat.
The Tower
Go to the Guide-Selling Old Lady's house from infor!Mashun and climb on the roof.
Once you have the Stone, Sea, Dragon, and Red Compasses, "check" the sky to enter the Tower.
- Floor 1: Flip the switch in the bottom-left. The other switch just makes a bunch of fake switches appear.
- Floor 2: Equip a Rosary on Russell (Dogma starts with one, and the old lady will sell it if you don't have one), and offer it at the Dark, Fire, Ice, and Light doors in order.
- Floor 3: There are secret passages indicated by distorted floor tiles. Flip the switch in the isolated room near the start, go through the passage at the top, follow the arrow down, and flip the switch hidden in that passage. A passage will open on the right.
- Floor 4: Follow the three sets of directions (start from the eye closest to the entrance for each one) to find three switches: right 7 and up 4, right 12 and down 10, down 13 and right 1. Don't step on any tiles above the eyes, or you'll fight a Nightmare which you can't run from.
- Floor 5-7: Drink murky water to get past the unseen barriers. Drink clear water to get past the hallucinations blocking two rooms with switches, then murky water again to see the door in the fountain. Also, where there are two chests next to each other, make sure to talk to the nearby Enigmafish hallucination to get permission to open one. The left has the Mythic Cross Sword for Dogma and the right has the Mythic Wood Wand for Cody.
- Floor 8: Follow the directions to navigate through the spikes: up 3, right 2, up 3, left 2, up 5, right 2, up 2, left 3. Walk right, then step into a side area to let the Jizo statues go past.
- Floor 9: Follow the directions. Both chests are surrounded by spikes, so you should flip the switch to disable the spikes first.
Day 6
Main Plot
Yumi will meet you outside. Go to the SOS? building and talk to her.
Choose a person in town to be your night-watch partner.
(Note: There are several ending variations based on the person you pick here.)
Tell your partner you're ready and go to the festival in Seaside (on the east side).
Talk to the Chief Kelpie near the tower in the center, who asks you to look for the Igniting Torch.
The torch is hidden behind coral in the top-left. Bring it back to the Chief.
On the way back to town, you'll encounter the Toxic One. Chase after it and fight.
Continue chasing and fight it once more.
Afterward, you're sent back to town, and can't leave anymore for the day.
Go home.
Guilt Events
What Are We Doing Here?
Return to Clover Hospital with Mireille and go to the roof.
Mireille learns Dirty Truth, Guilt +5.
Sidequests
Dazzling Floors (Day 6 Only)
Go to Seaside Relieving Hotel (the right one) with Mireille and talk to the Pengi about cleaning the hallway.
You get a Dark Guide Vol. II.
Medicine Fanatic (Day 6 Only)
Take a Perfect Pill and Superb Capsule to the Draken outside the medicine shop on Dragons' Peak.
You get a Higan Manjuu.
Day 7
Main Plot
Talk to Saxon and say you'll participate to gain access to the final dungeon, the Cradle.
Enter the Cradle and head to the far-bottom-left.
Defeat the Indecent One.
Return to town and talk to the informant.
Choose "What should I do?" for True Ending 1, and "No..." for True Ending 2.
For True Ending 1, go to the house of the person you chose as your partner and do as instructed.
(The password in True Ending 1 is for the mailbox in the gallery.
It contains a supply of helpful items for repeat playthroughs.)
Guilt Events
Your Fault (Day 7 Only)
Talk to the warehouse owner on Dragons' Peak.
Guilt +5.
Sidequests
Collapse
Seaside and Dragons' Peak are warped on Day 7, though besides the guilt event, there isn't much in them.
The Book Graveyard
Requirements to enter the bonus dungeon, the Book Graveyard, on Resort Island:
- Have 40 or more Guilt Points.
- Have cleared the Tower (above the Guide-Selling Old Lady's house).
- Come on Day 7 before night.
- Enter the password from True Ending 1: 23939
- Guide for the puzzles in the Book Graveyard:
- One room has a book with a heavy Dictionary on top of it. Push the chair over to it to take the Dictionary.
- Backtrack and enter the earlier door to the room with three shelves in the wall. Push the chair up to the high-up middle one, then put a character 5'4" or taller in your party to get their help.
- Take the Small Key that falls outside to unlock the door further in.
- Talk to the monkey to the left. Go to the right to get the Beer Bottle, then go back to use it on the monkey.
The Worker's Apron in a present box on the way upstairs is the "refined apron" the Fashion Magazine likes.
Equip it on Russell and talk to her to access a special shop.
Bonus Room
Beating the boss of the Book Graveyard gets you the 0 & 1 Compass.
After using the compass, re-enter the building where it used to be to visit a bonus room.
Extra Links
Some of these may contain spoilers for any and all aspects of the game. Only look after you've beaten it fully.
Translation Notes
Gallery Pages
Inside Stories
Dreamsend Let's Play Inc.
Second Anniversary Video: "Knife"